

Showing posts with label bird-feeders. Show all posts
Showing posts with label bird-feeders. Show all posts
Friday, January 3, 2014
Tuesday, September 10, 2013
DIY Fruit and Hummingbird Feeders
Earlier this year I conducted a class for the Master Gardener chapter that I'm a member of on making bird-feeders utilizing natural sources, recycled materials and re-purposed items. Of course the best bird-feeder is what nature provides: nuts, seeds and fruit from native trees, shrubs and wildflowers (and native insects)... Here's my hand-out for my "bird" talk I give: Creating a Bird Garden
I love watching the hummingbirds eat from their favorite flowers around my property: Trumpet Vine, Cardinal Flower, Columbine... But to get the up-close views of a hummer, nothing beats a strategically placed feeder. - And this one costs only about $5.00! :)
 Supplies:
How to:
Using the pliers (and a towel placed around the end of the wire to keep from scratching the copper), clamp the wire and bend a loop on one end. This gives you something to hold onto... Start at the neck of the bottle and twist the wire around the bottle. Add another loop in the wire at the top of the bottle for hanging.
Add the embellishment and fill the bottle with a hummingbird nectar solution (1 part sugar dissolved in 4 parts water) - then add the feeder tube. Be sure to fill the bottle to the top with the solution - this creates a tight seal...
 DIY Fruit Feeders
I invite you to "like" my Facebook page to see all the Market happenings and my latest DIY projects! Click on this link:
Outdoor Wednesday
Down Home Blog Hop
From the Farm Blog Hop
I'd Rather B Birdn'
Wild Bird Wednesday
Nature Notes


 |
| Female Ruby-throated Hummingbird - Butterfly Bush |

- Copper wire - 6 or 8 gauge. Available at Home Depot for less than a $1.00 per foot. 8 gauge is easier to bend, but I prefer the look of 6 gauge. - About 2 feet.
- Glass bottle. A wine bottle is too large - it won't hold the seal of the feeder adapter. Opt for a smaller glass water or beer bottle.
- Bling or emlishments. Something red will attract and entice the hummers. Small gauge wire -available at craft stores to attach the pendent, decoration, etc...
- Hummingbird feeder tubes. You can occasionally find these at pet stores or I sell them in my Etsy shop 2 for $4.00. Here's the link: Rebecca's Bird Gardens (Etsy Shop)
- Wire cutters, needle-nosed pliers.
 |
| Male Ruby-throated Hummingbird |
Using the pliers (and a towel placed around the end of the wire to keep from scratching the copper), clamp the wire and bend a loop on one end. This gives you something to hold onto... Start at the neck of the bottle and twist the wire around the bottle. Add another loop in the wire at the top of the bottle for hanging.
Add the embellishment and fill the bottle with a hummingbird nectar solution (1 part sugar dissolved in 4 parts water) - then add the feeder tube. Be sure to fill the bottle to the top with the solution - this creates a tight seal...
 |
| Female Ruby-throated Hummingbird |
 DIY Fruit Feeders
- Spiral Fruit Feeder: Copper Wire: 8 gauge wrapped around a rolling pin to create a "fruit cage" to hold oranges, apples, etc...
- S Hook Fruit Feeder: Small stick with a hole drilled in the center. Wrap 8 gauge copper wire through the drilled hole creating an "S" shape for hanging.
- Sheppard's Hook Fruit Feeder: Small stick with a hole drilled in the center. Push the drilled portion of the stick through the hook then simply add assorted fruit...
 |
| Immature Male Summer Tanager |
Outdoor Wednesday
Down Home Blog Hop
From the Farm Blog Hop
I'd Rather B Birdn'
Wild Bird Wednesday
Nature Notes

Monday, August 26, 2013
DIY Summer Wreath Bird-Feeder
Earlier this year I conducted a class for the Master Gardener chapter that I'm a member of on making bird-feeders utilizing natural sources, recycled materials and re-purposed items. Of course the best bird-feeder is what nature provides: nuts, seeds and fruit from native trees, shrubs and wildflowers (and native insects)... Here's my hand-out for my "bird" talk I give: Creating a Bird Garden
In the class, I demonstrated a winter version of this feeder utilizing cuttings from shrubs and trees (cedar, holly, winterberry, chokecherry). Now that the sunflowers and wildflowers are going to seed, I thought that I would put together a summer feeder in the same fashion.
For the complete DIY instructions, click here: DIY Winter Wreath Bird-Feeder
 Supplies:
Cut three pieces of jute about 50" in length. Divide the splatter guard into thirds. Make three small holes through the screen and connect the splatter guard to the wreath with the jute (the screen will hold birdseed in the finished feeder). I did end up spray painting the edge of the splatter guard brown because the shiny silver was annoyingly obvious.
Bring the three strings up and tie into a loop. Braid the remaining string and tie another loop (which will hold the birdseed ♥).
Tuck cuttings from sunflowers and native wildflowers into the wreath. In addition to sunflower heads, I used Ashy Sunflowers, False Sunflowers, Coneflowers and Black-eyed Susans.
I also added a birdseed heart in the center of the feeder. - Here's the recipe: DIY Birdseed Wreaths
Add birdseed to the center of the feeder (on top of the splatter guard).
It seems to be a hit with my feathered visitors! ~ I'll have to come up with a fall version next. :)
Outdoor Wednesday
Down Home Blog Hop
From the Farm Blog Hop
I'd Rather B Birdn'
Wild Bird Wednesday
Nature Notes
Clever Chick Blog Hop
 |
| Blue Jay |
In the class, I demonstrated a winter version of this feeder utilizing cuttings from shrubs and trees (cedar, holly, winterberry, chokecherry). Now that the sunflowers and wildflowers are going to seed, I thought that I would put together a summer feeder in the same fashion.
For the complete DIY instructions, click here: DIY Winter Wreath Bird-Feeder

- Grapevine wreath - $2.50 (Wal-Mart)
- Splatter guard - $1.00 (Dollar Store)
- Jute (minimal cost)
- Cuttings from sunflowers, wildflowers, native grasses
Cut three pieces of jute about 50" in length. Divide the splatter guard into thirds. Make three small holes through the screen and connect the splatter guard to the wreath with the jute (the screen will hold birdseed in the finished feeder). I did end up spray painting the edge of the splatter guard brown because the shiny silver was annoyingly obvious.
Bring the three strings up and tie into a loop. Braid the remaining string and tie another loop (which will hold the birdseed ♥).
Tuck cuttings from sunflowers and native wildflowers into the wreath. In addition to sunflower heads, I used Ashy Sunflowers, False Sunflowers, Coneflowers and Black-eyed Susans.
 |
| Tufted Titmouse |
 |
| Carolina Chickadee |
 |
| Tufted Titmouse ~ Carolina Chickadee |
Add birdseed to the center of the feeder (on top of the splatter guard).
It seems to be a hit with my feathered visitors! ~ I'll have to come up with a fall version next. :)
Outdoor Wednesday
Down Home Blog Hop
From the Farm Blog Hop
I'd Rather B Birdn'
Wild Bird Wednesday
Nature Notes
Clever Chick Blog Hop
Tuesday, June 4, 2013
DIY Oriole Feeder
I recently conducted a class for the Master Gardener chapter that I'm a member of on making bird-feeders utilizing natural sources, recycled materials and re-purposed items. Of course the best bird-feeder is what nature provides: nuts, seeds and fruit from native trees, shrubs and wildflowers (and native insects)... Here's my hand-out for my "bird" talk I give:
Creating a Bird Garden

But - this class was all about creating bird-feeders and I came up with a few originals and I experimented with several I found on the Internet. I've never actually attracted Orioles to my property (until this year!), but I came up with a DIY Oriole feeder that utilizes a chick feeder as the base. This spring I caught a glimpse of the Baltimore Orioles passing through my Southwest Missouri property and I had an opportunity to give the feeder a test. I filled the feeder base with a mixture of local organic grape jelly and water (makes a thick syrup) and the Orioles sipped on the sweet juice for a week before they migrated to their summer location...
Click on this link for the steps in learning the skill of drilling holes in glass jars and plates:
DIY Wine Bottle Bird-Feeders.
Here's a few tips to attract this colorful bird from the Cornell Lab of Ornithology:
Baltimore Orioles seek out ripe fruit. Cut oranges in half and hang them from trees to invite orioles into your yard. Special oriole feeders filled with sugar water supplement the flower nectar that Baltimore Orioles gather. You can even put out small amounts of jelly to attract these nectar-eaters (just don't put out so much that it risks soiling their feathers). Planting bright fruits and nectar-bearing flowers, such as raspberries, crab apples, and trumpet vines, can attract Baltimore Orioles year after year.
Outdoor Wednesday
I'd Rather B Birdn'
Wild Bird Wednesday
Nature Notes
Creating a Bird Garden

But - this class was all about creating bird-feeders and I came up with a few originals and I experimented with several I found on the Internet. I've never actually attracted Orioles to my property (until this year!), but I came up with a DIY Oriole feeder that utilizes a chick feeder as the base. This spring I caught a glimpse of the Baltimore Orioles passing through my Southwest Missouri property and I had an opportunity to give the feeder a test. I filled the feeder base with a mixture of local organic grape jelly and water (makes a thick syrup) and the Orioles sipped on the sweet juice for a week before they migrated to their summer location...
 |
| I have to admit these feeders look a little like a spaceship... |
My DIY feeder basically consists of a chick feeder (found at any farm supply store - $3.00) and a small jelly jar. To make a hanging version I drilled a hole in the jar using a 1/4" diamond drill bit and used a long 1/4" eye bolt. If you want to add a plate, just drill another hole in the plate using the same drill bit then add nuts and rubber washers to hold everything in place (a little bit of thread lock helps to make it secure).
Click on this link for the steps in learning the skill of drilling holes in glass jars and plates:
DIY Wine Bottle Bird-Feeders.
 |
| Male Baltimore Oriole |
 |
| Male Baltimore Oriole |
 |
| Female Baltimore Oriole |
Baltimore Orioles seek out ripe fruit. Cut oranges in half and hang them from trees to invite orioles into your yard. Special oriole feeders filled with sugar water supplement the flower nectar that Baltimore Orioles gather. You can even put out small amounts of jelly to attract these nectar-eaters (just don't put out so much that it risks soiling their feathers). Planting bright fruits and nectar-bearing flowers, such as raspberries, crab apples, and trumpet vines, can attract Baltimore Orioles year after year.
I'd Rather B Birdn'
Wild Bird Wednesday
Nature Notes
Monday, May 6, 2013
Rose-breasted Grosbeak
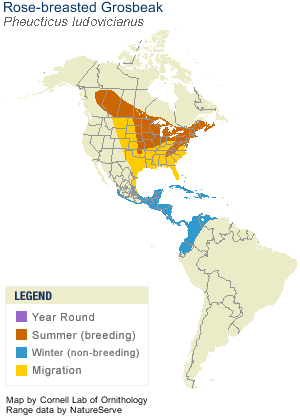
I had a migrant briefly stop by my feeder last week...
Apparently Rose-breasted Grosbeaks are crazy over sunflower seeds and fortunately I had just filled the feeder earlier during the day. It was pretty exciting for me because this is the first time I've ever seen a Grosbeak
Rose-breasted Grosbeaks winter in Central and South America then migrate to the northeastern United States and southeastern and central Canada for their summer home (breeding). If you look closely at the map, my property is right on the edge of the migration - summer breeding location... I'm sure he was just passing through, he's not a common backyard bird in my neck of the woods. I wish he would have stayed a little longer, but at least I was able to take a few photos of his brief visit.


Monday, March 11, 2013
DIY Burlap Thistle Sock
 |
| Pine Siskins ~ Cardinal watching the action! |
But - this class was all about creating bird-feeders and I came up with a few originals and I experimented with several I found on the Internet. As far as I know this DIY is an original, but I've came to the conclusion that there really isn't a novel idea anymore. Even if you think that you thought of something first - you probably didn't... Really the best thistle feeder is a purchased tube feeder that is specifically designed to hold this small seed and prevent waste. When I tried to come up with a DIY way to offer thistle, a sock feeder seemed like the logical option. The examples that I found didn't seem that durable and were rather unattractive, such as a DIY thistle sock made out of recycled or repurposed pantyhose... Another tutorial used the mesh lining out of old running shorts. Neither of these examples sounded as if they would hold up very long or actually work. I decided to construct my own version of a thistle sock using burlap because - it's cheap, the weave is small enough that the seed won't fall out and it's more attractive than watching the birds eat from an old pantyhose :) I'm not sure how long this sock will last... So far it's been re-filled three times and hasn't shown any signs of damage. And - at less than 50 cents a feeder, I think it's a pretty cheap way to offer thistle to my backyard birds - if only the thistle or Nyjer seed wasn't so expensive!

1/4 yard burlap (about $1.00 and will make 3 socks)
jute
sewing machine, scissors, pins...

An easy trick to cut a straight line in burlap is to pull a string out. - This makes a line to follow when cutting...


Turn the sock right side out.


Add thistle to the sock (a funnel works well), pull the jute tight and tie. Make the jute strands into a slip knot to hang.
Watch the action!
 |
| Pine Siskins and American Goldfinches |
 |
| Male Red-bellied Woodpecker Not at all interested in thistle... Just a resting spot! |
Down Home Blog Hop
I'd Rather B Birdn'
Wild Bird Wednesday
Nature Notes
Clever Chick Blog Hop
Friday, March 1, 2013
DIY Suet Wreath
 |
| Male and Female Downy Woodpeckers Tufted Titmouse |
But - this class was all about creating bird-feeders and I came up with a few originals and I experimented with several I found on the Internet. For this DIY suet wreath, here the link to one of the best tutorials I found: Create a Suet Bird Seed Wreath
I've been making my own suet for years and I am sure the birds prefer my homemade version over a purchased suet cake... In fact, I've never had a bluebird visit a suet feeder at my property unless it contained my homemade recipe! In addition to coating pine-cones with my suet mixture, I've been experimenting with some other options to offer this food supplement. Here's my recipe and the link to what I've came up with so far... DIY Suet Feeders

1 cup lard ~ You can render your own suet from beef fat (it's an all day process), but I prefer purchasing lard, which is pork fat.
1 cup chunky peanut butter
Melt the lard and peanut butter together, then add:
3 cups cornmeal
1/2 cup flour
4 cups birdseed
For the suet wreath, I added the following to the basic suet recipe:
1 package unflavored Knox gelatin dissolved in 1/2 cup warm water
Add the prepared suet mixture to a greased Bundt pan. I also picked up a helpful tip from the tutorial above and added a wire ring insert. - Place half of the suet mixture into the pan, add the wire ring, then the remaining suet. Pack the mixture down thoroughly into the pan with the back of a metal spoon. Refrigerate overnight. Allow the wreath the return to room temperature and it should be easy to remove from the pan. I added braided strips of burlap to use as a hanger. This wreath holds up much longer than you would expect and the wire ring insert helps to keep it from falling apart.
 |
| Carolina Chickadee |
 |
| Tufted Titmouse |
Outdoor Wednesday
I'd Rather B Birdn'
Wild Bird Wednesday
Nature Notes
Friday, February 22, 2013
Pine Siskins
I had a flock of Pine Siskins invade the feeders during an ice storm this past week at my southwest Missouri property. I thought at first they were the American Goldfinches, which are always present, but a little closer view made it clear they were a different visiting finch...


Even though they were the smaller of finches that are normally around my feeders, they definitely showed their spunk and were not in the least intimidated by their larger cousins! In fact they even fought among the other members of their own flock over who had the best spot...
Outdoor Wednesday
I'd Rather B Birdn'
Wild Bird Wednesday
Nature Notes
 |
| Pine Siskin ~ American Goldfinch |


Even though they were the smaller of finches that are normally around my feeders, they definitely showed their spunk and were not in the least intimidated by their larger cousins! In fact they even fought among the other members of their own flock over who had the best spot...
 |
| House Finch vs. Pine Siskin ~ Siskin vs. Siskin |
Outdoor Wednesday
I'd Rather B Birdn'
Wild Bird Wednesday
Nature Notes
Sunday, February 17, 2013
DIY Chick-Feeder / Bird-Feeders
 I'm preparing a class for the Master Gardener chapter that I'm a member of on making bird-feeders utilizing natural sources, recycled materials and re-purposed items. Of course the best bird-feeder is what nature provides: nuts, seeds and fruit from native trees, shrubs and wildflowers (and native insects)... Here's my hand-out for my "bird" talk I give: Creating a Bird Garden
But - this class is all about creating bird-feeders and I've been trying a few DIY feeders I've found over the Internet. These DIY chick-feeder inspired bird-feeders are all over the web, especially Pinterest and Etsy... And if you happen to have a flock of backyard chickens that have outgrown these feeders, they're a great way to re-purpose. If you don't have a spare chick-feeder laying around (or never had a reason to purchase one), they are only about 2-3 dollars at a farm supply store.
I came up with three different ways to transform this domestic bird-feeder into a wild bird-feeder...
The first involves drilling a holes in a mason jar and glass plate. Click on this link for the steps in learning this skill: DIY Wine Bottle Bird-Feeders. Once the holes are drilled: add an eye bolt, a couple of rubber washers and nuts. The hardest part of this feeder was figuring out how to tighten the nuts (your hand won't fit inside the jar). My husband then brought me a basin wrench to accomplish this task, but it was still a little difficult to get the nuts tightened securely.
 |
| American Goldfinches |
 |
| Carolina Chickadee ~ Tufted Titmouse |
 |
| American Goldfinch ~ Tufted Titmouse |
These bird-feeders are cute, but they really don't hold a large quantity of birdseed - but the birds and (my backyard flock) seem to approve!
I'd Rather B Birdn'
Wild Bird Wednesday
Nature Notes
Sunday, February 10, 2013
DIY Wine Bottle Bird-Feeders
I'm preparing a class for the Master Gardener chapter that I'm a member of on making bird-feeders utilizing natural sources, recycled materials and re-purposed items. Of course the best bird-feeder is what nature provides: nuts, seeds and fruit from native trees, shrubs and wildflowers (and native insects)... Here's my hand-out for my "bird" talk I give: Creating a Bird Garden
But - this class is all about creating bird-feeders and I've been trying a few DIY feeders I've found on the Internet. Here's the link of the inspiration for this fun feeder: Michelob Bird feeder

The hardest part of this DIY feeder was learning how to drill a hole in a glass bottle...
Here's the steps in a nutshell:
- Start with a diamond drill bit. We purchased one that's a little less than a 1/2 inch diameter. It works well for small seeds such as sunflower chips or safflower, but it's a little too small for sunflower seeds.
- The drill needs to stay lubricated with water so either have the bottle somehow submerged in water or have someone spray water at the bit during the drilling.
- Start drilling at a 45° angle (have the drill on and go toward the glass--don't put the drill bit on the glass and then start the drill).
- Slowly move the bit to a 90° angle. Avoid applying pressure (you're grinding or chipping away at the glass, not drilling).
- Continue to spray water on the bit and stop a few times and clean the area off and apply more water.
- It's a slow process... When you're close to the end, slow the speed of the drill down and mentally remember to go up with the drill and not push the drill through the bottle. ( I did that a few times and the bottle shatters). ~ Remember to wear protective eye glasses...

 |
| Carolina Chickadee |
 |
| American Goldfinch ~ Cardinal waiting his turn... |
Once the holes are drilled (one on each side), use epoxy to attach a plate or saucer to the bottom. To hang the bottle I wrapped a piece of 8 gauge copper wire around the top. A couple of the bottles had hinged stopper lids which made it even easier to add a wire to hang.
The blue bottle with the hinged top I found at the recycle center is Redstone Meadery Juniper Honey Wine. The clear bottle is a Lemonade bottle and The Winking Owl wine bottle was also from the recycle center - but I could have purchased it for less than $3.00 a bottle!
Cheers! ♥
 |
| American Goldfinch |
 |
| Downy Woodpecker |
 |
| Tufted Titmouse |
 |
| Carolina Chickadee ~ Tufted Titmouse |
I invite you to "like" my Facebook page to see all the Market happenings and my latest DIY projects! Click on this link:
Update! ~ Check out my new line of wine bottle bird-feeders in my Etsy shop! ♥ Click on this link:
Rebecca's Bird Gardens (Etsy)
Also, I'm moving most of my market updates, bird watching and DIY projects over to my Rebecca's Bird Gardens site... Click on these links:
Rebecca's Bird Gardens (website)
Rebecca's Bird Gardens (blog)
Rebecca's Bird Gardens (Etsy)
Also, I'm moving most of my market updates, bird watching and DIY projects over to my Rebecca's Bird Gardens site... Click on these links:
Rebecca's Bird Gardens (website)
Rebecca's Bird Gardens (blog)
 |
| Wine Bottle Bird-Feeder ~ "The Vineyard" |
Subscribe to:
Posts (Atom)
LinkWithin
